May 28, 2020
Making Hiroshima Style Okonomiyaki
Okonomiyaki (o-konomi-yaki) is most easily described as a Japanese savory pancake made from a variety of ingredients that includes shredded cabbage, flour, and yam based batter, meat (generally fresh pork belly) and seafood. The name comes from the word okonomi, meaning “how you like” or “what you like”, and yaki meaning “cooked” (usually fried). Okonomiyaki is mainly associated with the Kansai or Hiroshima areas of Japan but is also widely available throughout the country. Toppings and batters tend to vary according to region. To read more about the history of okonomiyaki, click here.
Traditional and very Japanese, okonomiyaki is also fun to make. While you can probably get away with cooking okonomiyaki in a frying pan, your best bet is a portable tabletop flat hot plate. If you want to try your luck at making real Hiroshima-style okonomiyaki at home, we have you covered! o
Ingredients
(***see the link for Amazon page the okonomi flour, otafuku sauce, and Japanese mayonnaise)
- 100g okonomiyaki flour (you can substitute all-purpose flour)
- 120ml water
- 3 eggs
- 150g cabbage
- 60g bean sprouts
- 6 rashers bacon
- 2 servings par-boiled yakisoba noodles
- okonomiyaki sauce
- kewpie mayonnaise (AKA “Japanese mayonnaise”)
- 2 chopped spring onions
- pinch of aonori powdered seaweed
- katsuobushi dried bonito flakes
- 1 tsp pickled ginger
Instructions
- Wash and chop your green onion and cabbage. Try to chop your cabbage as thin stands as possible. And place to the side in separate bowls.
- Mix the okonomiyaki flour with the water and 1 egg until you have a smooth batter with no lumps.
- The fun part: frying- on your frying pan or hot plate and lightly grease with a splash of vegetable oil and place on medium heat. Make sure the pan is evenly heated before the next step or you will have trouble getting the shape round.
- Add just under half the batter to the pan in a nice even circle, remember not to make the circle too wide or it won’t be able to keep its shape. Next, add half the cabbage and half the bean sprouts on top of the batter and after a few minutes layer 3 rashes of bacon over the cabbage and sprouts.
- Drizzle 1 tbsp of the batter over the top of the entire thing to hold everything together and let the okonomiyaki cook for about 7 to 10 minutes before flipping it over with a spatula to cook on the other side.
- Whilst the other side of the okonomiyaki is cooking for 7 to 10 minutes, in another pan cook 1 serving of yakisoba noodles drizzled with a bit of vegetable oil.
- Once the yakisoba is cooked, with a spatula move the okonomiyaki on top of the noodles. Crack an egg in the first pan (I prefer not to break the yolk so you get a nice runny yolk but pretty much every store in Hiroshima except Lopez will break the yolk and stir it in with the white) and fry for a bit.
- Place the okonomiyaki (with the noodles underneath) over the egg and leave to cook for 1 to 2 minutes. Once done, flip the completed okonomiyaki over onto a plate and smother in a criss-cross pattern with okonomiyaki sauce (optional mayonnaise).
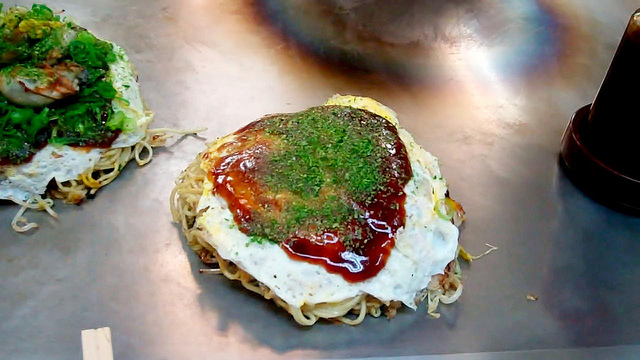
- The final touch is to sprinkle the spring onion, aonori seaweed, katsuobushi, and pickled ginger on the top. Also, try it with chopped jalapeno!
- Repeat the whole process again for the second okonomiyaki and you’re done.
ENJOY!
Photo: flickr.com “Okonomiyaki – Hiroshima Style” by jlibrarianidol (CC BY-SA 2.0)
Hugh Cann subscriber
About the author